I treat LANs and weekend tournaments like modular engineering challenges: how do I carry everything I need, set up quickly, and avoid the cable spaghetti that turns a hyped game night into a frantic troubleshooting session? Over the years I’ve iterated on a carry system that fits in one backpack, keeps fragile gear safe, and lets me go from door to playseat in under five minutes. Below I walk through my portable, LAN-ready gaming backpack build and the routines that keep cable chaos to a minimum.
Packing philosophy: modular, fast, repeatable
My approach is simple: divide by function. Power, display, input, and extras each get their own bag or pocket. That way I can hand someone a component without digging through everything — and I can replace or upgrade a single module without upsetting the whole system. I also optimize for hot-swapability: components that I might change mid-session (mouse, headset, external SSD) are easiest to reach.
Two second rules I live by:
Everything has a home. If it doesn’t have a dedicated pocket or pouch, it ends up as cable spaghetti.Label visible connection points. A quick bit of tape or small colored tags saves minutes when you’re under time pressure.Backpack and internal organization
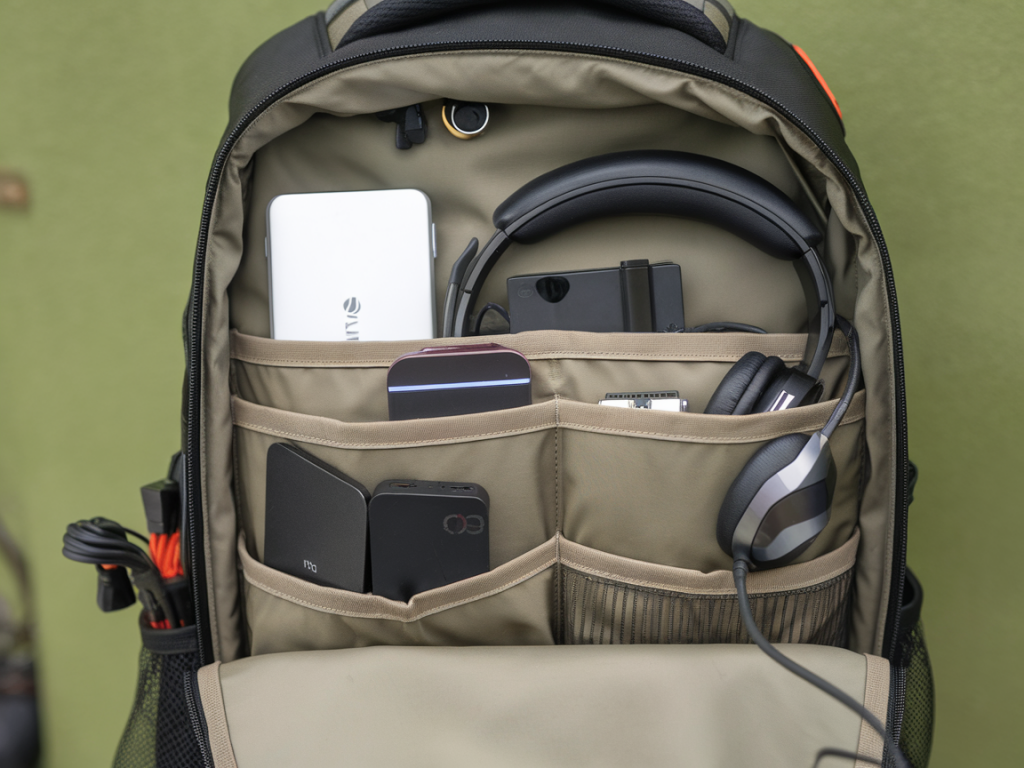
Pick a backpack designed for tech. I use a 20–30L dedicated tech pack with configurable dividers and a hard laptop compartment. Brands that do this well include Peak Design, Nomatic, and Thule. Look for:
Rigid laptop sleeve (fits 15–17” depending on your laptop).Padded internal dividers or removable cubes.External pockets for quick access items (keys, cable adapters).I use small soft cases for each module: a power cube, a dock cube, an input cube, and an accessory pouch. Soft cases compress to fit the backpack and protect cables from getting pinched.
Core components and why I pick them
Here’s the set I typically bring and my reasons:
Laptop / Portable PC — My main unit, usually a 15–17” gaming laptop (ASUS ROG, Razer Blade, or similar). I keep a small microfiber sleeve and never pack loose in the bag.Portable monitor — 15.6” 144Hz USB-C monitors (Asus ROG Strix XG or Mobile Pixels) that accept USB-C with Power Delivery reduce cable count.USB-C hub / dock — A single hub handling display out, Ethernet, USB-A, and PD input pays dividends. I prefer docks with pass-through PD of at least 100W (Satechi, CalDigit).Power bank with PD — A 20,000–27,000 mAh power bank with 65–100W PD lets me charge laptop or monitor when outlets are scarce (Anker PowerCore+ or Zendure SuperTank).USB-C to Ethernet adapter — Fast, reliable network beats flaky Wi‑Fi at LANs; use the hub or a standalone adapter.Quality cables — Short, shielded USB-C cables for PD and video, braided DisplayPort/HDMI for monitors, and a few short USB-A cables for peripherals.Peripherals — Compact mechanical keyboard (60–75%), travel mouse (e.g., Logitech G Pro Wireless), foldable mousepad, and a small headset (HyperX Cloud II or Audeze Mobius).External SSD — Portable NVMe SSD (Samsung T7, WD My Passport SSD) for game installs, clips and demos.Optional: eGPU or external GPU dock — For those who want desktop-level GPUs at events. I only bring one when I know I’ll need extra firepower — they’re heavier and require more power/cooling consideration.Minimizing cable chaos: strategy and gear
Here’s the step-by-step of how I keep things tidy and fast to set up.
Favor multi-function cables: Use USB-C with PD + DisplayPort alt mode whenever possible so the same cable handles power and video.Bring short cables: Short cables (20–30 cm) keep everything close to the hub and reduce tangling. Only use longer cables where necessary (like to reach a monitor behind your chair).Use a single dock: Plug laptop into one hub; then connect monitor, Ethernet, and peripherals to the hub. This single disconnect point makes packing simple.Color-code connectors: A small dot of paint or sticker on each cable end tells at-a-glance where each plug goes — laptop power vs monitor power vs dock PD.Velcro straps and cable organizers: I wrap cables with Velcro loops and keep a pack of reusable cable ties in the accessory pouch; these are far superior to twist-ties for repeat events.Label both ends: Put a tiny label near the plug and near the cable end. When swapping items in dimly-lit halls you’ll thank yourself.Quick setup checklist I use at every LAN
Unpack backpack and extract the dock and power cube first.Place laptop on table, connect dock with short USB-C PD cable.Plug monitor into dock (or directly to laptop if not using a dock) with short video-capable USB-C or DP cable.Connect Ethernet to dock and test network latency.Plug in peripherals to the hub; pair wireless mouse/headset if needed.Mount headset on hook and position mousepad — keep power strip tucked under table if you need to chain multiple chargers.Table: recommended gear at a glance
| Category | Recommended | Why |
| Backpack | Peak Design Everyday / Nomatic | Configurable dividers, laptop protection |
| Dock | CalDigit TS3 Plus / Satechi 4-in-1 | Single-cable connectivity, PD pass-through |
| Power Bank | Anker PowerCore+ / Zendure SuperTank | High-capacity PD to charge laptop/monitor |
| Portable Monitor | ASUS ROG XG / Mobile Pixels | High refresh rate, USB-C video |
| SSD | Samsung T7 | Compact, fast NVMe storage |
Pitfalls I’ve learned the hard way
There are a few mistakes I keep coming back from:
Bringing too many long cables. They look useful until they turn into hiding places for dust and tangles.Underpowering the setup. Not all power banks supply sustained wattage for gaming laptops — check PD ratings and real-world load.Using cheap hubs. A flaky hub will ruin a LAN day. Invest in one with a solid reputation and firmware support.Ignoring ventilation. If you squeeze a laptop and dock into a tiny space, thermals suffer. Leave room for airflow.On-the-fly troubleshooting tips
When something inevitably goes wrong, I follow a short triage:
Swap cable: try the short spare USB-C first to isolate the connection.Bypass the dock: connect the monitor or Ethernet directly to the laptop if video or network is flaky.Check power order: sometimes monitors or docks won’t negotiate PD if the power bank or wall brick isn’t providing stable wattage.Restart devices: the oldest trick, but often effective for display handshake issues.LANs are about community and competition, but they’re easier when your setup is predictable and repeatable. With the right bag, a good dock, short cables, and a few labeling rules, you can carry a full gaming station on your shoulder and still be the first one ready at the table. If you want my specific parts list (model numbers and links) for a lightweight 15–17” laptop build or a heavy-duty eGPU-packed option, tell me your budget and I’ll put one together.